
Here we will let you know how to install latest version of OBS Studio on Ubuntu 20.04 LTS including Linux Mint and other similar operating systems.
OBS-Studio is an open-source software you need for recording and Streaming (live broadcast) your audiovisual content be able. You can use OBS-Studio Screencasts included Screen recording (e.g. slides, Software, etc …), camera image, and sound record very comfortably and if necessary it can be used to start streaming of the Content to various streaming server such as YouTube, Twitch, Facebook live, Mixer, Twitter and more for worldwide audiovisual transfer.
Contents
Steps to install OBS Studio on Ubuntu 20.04 LTS
1. Open Terminal
2. Run Linux system update
3. Command to install OBS Studio on Ubuntu 20.04
4. Run OBS Studio App
OBS Studio Autoconfiguration assistant
Capture your Ubuntu 20.04 Desktop Screen
Setting up additional image sources
Set up the microphone
Start recording on OBS Studio
Save Recording
Steps to install OBS Studio on Ubuntu 20.04 LTS
1. Open Terminal
On Ubuntu systems, the user can use the keyboard shortcut
Ctrl+Alt+T,
whereas on other Linux you can run the Terminal app from the Application launcher.
2. Run Linux system update
Before going further, let’s run the system update command that will ensure all the installed packages on the system are in their latest state. Also, this will rebuild the system cache.
sudo apt update
3. Command to install OBS Studio on Ubuntu 20.04
The packages to install OBS Studio on Ubuntu’s latest version such as 20.04 LTS are in the base repo. Thus, we don’t need to add any extra repository. Simply run:
sudo apt install obs-studio
4. Run OBS Studio App
Now, go to the Application launcher of Ubuntu 20.04 and search for the installed OBS Studio. As its icon appears, click to run the same.
OBS Studio Autoconfiguration assistant
When opening OBS Studio for the first time, an entry guide with the cumbersome name “Auto-configuration assistant” opens. This helps you set up the most important settings step by step and adjusts them to your hardware. To do this, click on the second box “
Optimize for recordings
” in the first dialog window. As a rule, you do not have to change any other settings.
Capture your Ubuntu 20.04 Desktop Screen
The interface of OBS Studio is kept simple – but you can adapt the interface individually and you have an enormous range of setting options that you can ignore for a simple recording.
For the pure screen recording, you can select these via the “
Sources
” window.
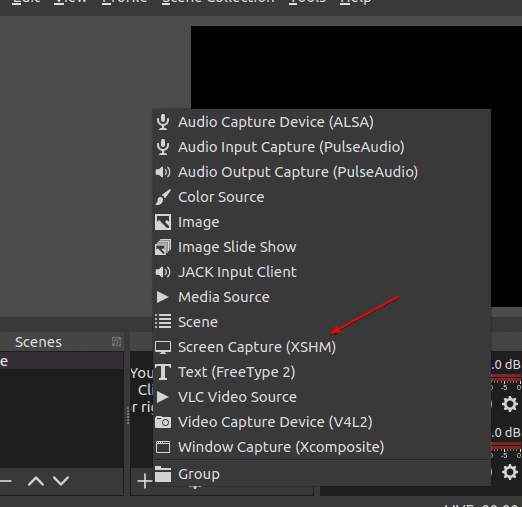
Click +
and select the
Screen Capture
option; You can still name these and create them by clicking
OK
. Your screen will be recognized automatically and the image will be displayed as a
preview
in the next window. If you have two screens, you can select the one you want here.
Setting up additional image sources
For a simultaneous recording of another image source (eg a webcam), this can also be selected in the “
Sources
” window under “
Video recording device
“; a webcam is usually automatically recognized here and the image is displayed in the preview window. The different video windows of the sources (eg “screen recording” and “video recording device”) can be individually adjusted in size and position.
You can also combine various image sources in post-processing with software such as Camtasia or DaVinci Resolve. This means one more work step, but you can concentrate fully on your text and, for example, controlling a presentation while recording.
Set up the microphone
Your microphone or headset has usually already been selected automatically as the sound source. (You can recognize this by the central display with the title “Microphone / AUX-Audio” and its deflection.) If this is not the case, you can do this manually via
Settings
→
Audio
→
Microphone
/
AUX-Audio
. All connected devices are displayed in the drop-down; choose it.
Start recording on OBS Studio
Now you can start the screen recording by clicking on the “
Start recording
” button given on the right side of the OBS Studio.
Save Recording
To stop and save the recording, just click on
“Stop recording
“. The finished video file is saved in MKV format. You can display the folder and the file by clicking on
File
→
Video recording
.
To change the folder for the output of the video file in the output settings (
Settings
→ Output → Record → Record path). You can also change the recording format here.
Other Articles:
Install SimpleScreenRecorder in Ubuntu 20.04 LTS to record screen
How to install Stremio on Ubuntu 20.04